


If you’re looking for an easy shamrock craft for kids this St. Patrick’s Day, our tissue paper Shamrock Suncatcher is the perfect project. This St. Patrick’s Day suncatcher craft is available in two sizes with our free printable shamrock template, and will bring a pop of festive green color to your window while welcoming St. Paddy’s Day!
Looking ahead? You may want to save our Easter Suncatchers for spring!

Shamrock Suncatcher Kids Craft
One of my personal goals for 2026 is to turn it into a “no-spend” year for craft supplies. Why? Because my garage currently looks like a craft store exploded inside it! There are popsicle sticks, pine cones, endless spools of ribbon—and an almost overwhelming mountain of tissue paper.
So, as part of my commitment to using what I already have, here we are with another tissue paper suncatcher project! After all, why buy new supplies when you can create something lovely from the craft stash you already own?
Our shamrock suncatchers are not only a great way to use up tissue paper, but also make a beautiful decoration for March. Whether you hang them in a classroom, your kitchen window, or a kid’s room, they are the perfect St. Patrick’s Day craft for kids.
You may enjoy pairing this craft with our colorful Rainbow Suncatchers!
Why You’ll Love This Craft
While crafting these festive shamrocks, children develop important skills, including:
- Fine motor skills: Cutting the shapes and carefully placing tissue paper strengthens little hands.
- Color recognition: Choosing different shades of green helps kids explore color and make creative decisions.
- Pattern awareness: Filling in the shamrock design encourages understanding of shapes and sequences.
- Following multi-step directions: Completing the suncatcher from start to finish supports focus and sequencing skills.
- Cultural awareness: Learning about St. Patrick’s Day traditions adds meaning and context to the craft.
Craft Materials Needed
Before you start this shamrock craft, make sure you have all the right supplies.
- Shamrock Suncatchers Template (free with email subscription)
- Tissue paper squares or circles
- Black cardstock (1 sheet per suncatcher)
- White cardstock (1 sheet for templates)
- Scissors
- Contact paper or self-seal laminating sheets (2 sheets per suncatcher)
- Double-sided tape
Do you use a Cricut or Silhouette machine? We are now offering SVG files for our suncatchers in our Teachers Pay Teachers shop. Click here to view and purchase our shamrock suncatcher printable files.
Watch the Video Tutorial
Check out the video below to see how we created our St. Patrick’s Day suncatchers.
Directions for Shamrock Suncatcher DIY
Follow the instructions below to create a colorful tissue paper shamrock suncatcher for St. Patrick’s Day.
STEP 1: Download and print the shamrock template. Access the printable shamrock template by clicking the link in the materials list and subscribing to our free craft newsletter. After subscribing, navigate to the post in our Substack titled Shamrock Suncatchers Free Printable to find your download link.
Print the free suncatcher templates on white cardstock. Our template includes one large shamrock and two small shamrocks.
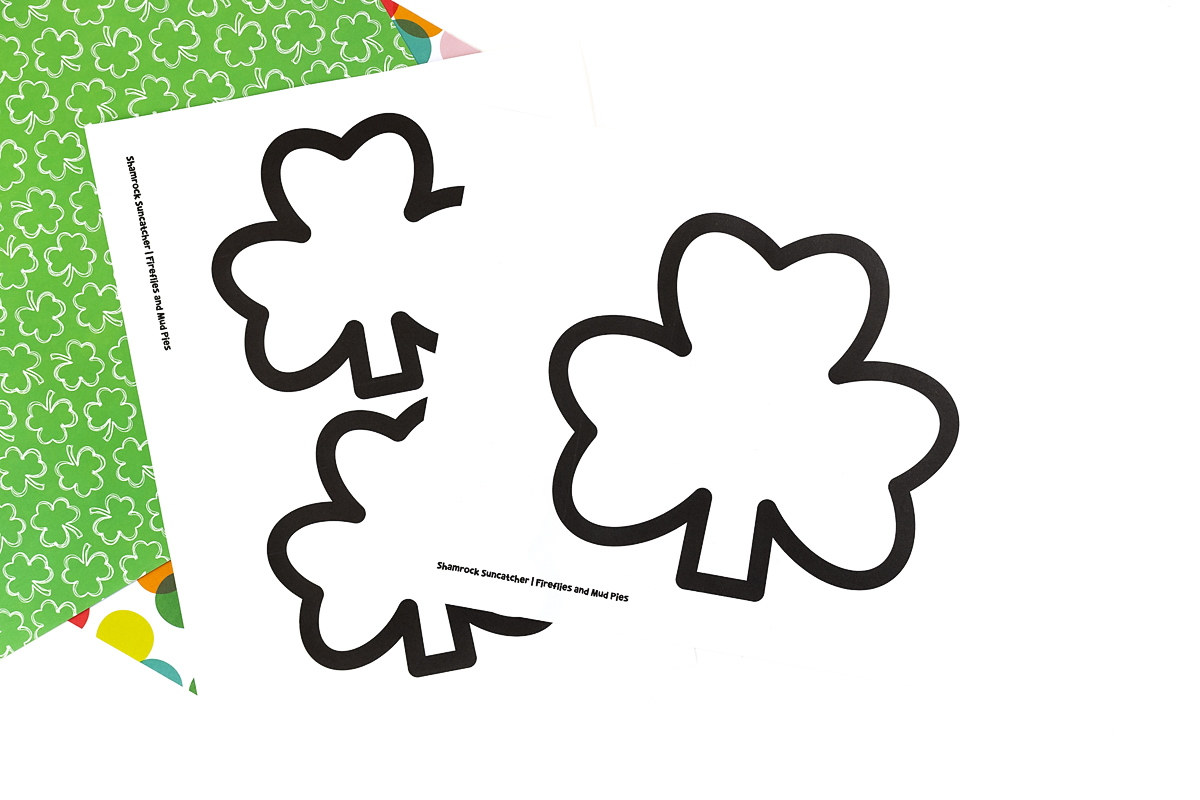
STEP 2: Cut out the shamrock frame. Carefully cut along the outlines of the shamrock suncatcher template using scissors. Since the designs are curvy, younger children may need some assistance. To create a solid black suncatcher frame, try one of these methods:
- If you have a cutting machine, you can purchase the SVG file from our Teachers Pay Teachers shop for easy cutting.
- Cut out the template first, trace it onto black cardstock with a white colored pencil, then cut it out.
- Place black cardstock behind the template, staple them together, and cut through both layers at once.

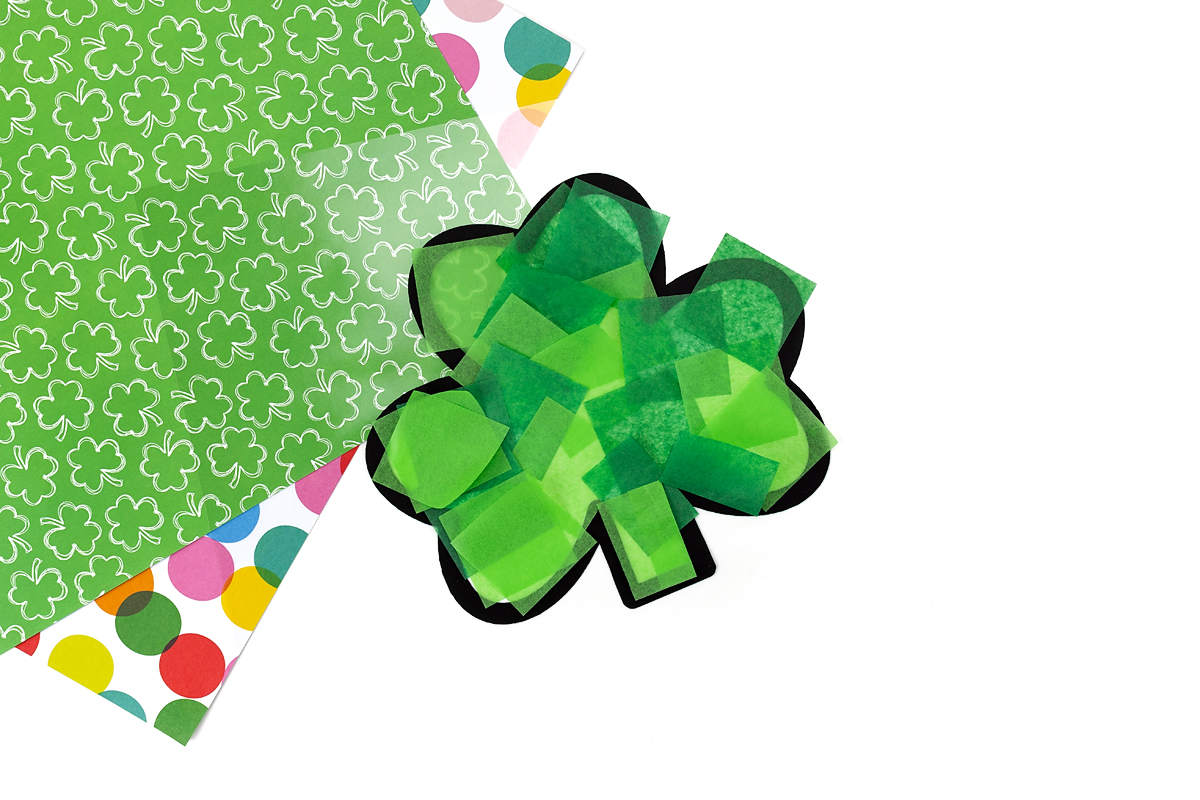
STEP 3: Place down the shamrock outline. Place the shamrock pattern onto the sticky side of the contact paper or self-seal laminating sheet. If you’re using shapes cut from white cardstock, make sure the side with the black ink is facing down.

STEP 4: Add the tissue paper. Fill the suncatcher frames with tissue paper shapes. Trim pieces as needed to fit smaller details, like the stem of the shamrock. Continue layering the tissue paper until the frame is completely covered, creating a vibrant stained glass effect.
STEP 5: Seal the design. After positioning the tissue paper, cover the design with a second adhesive sheet to seal it. Then, use scissors to carefully trim around the edges of the suncatcher frame.
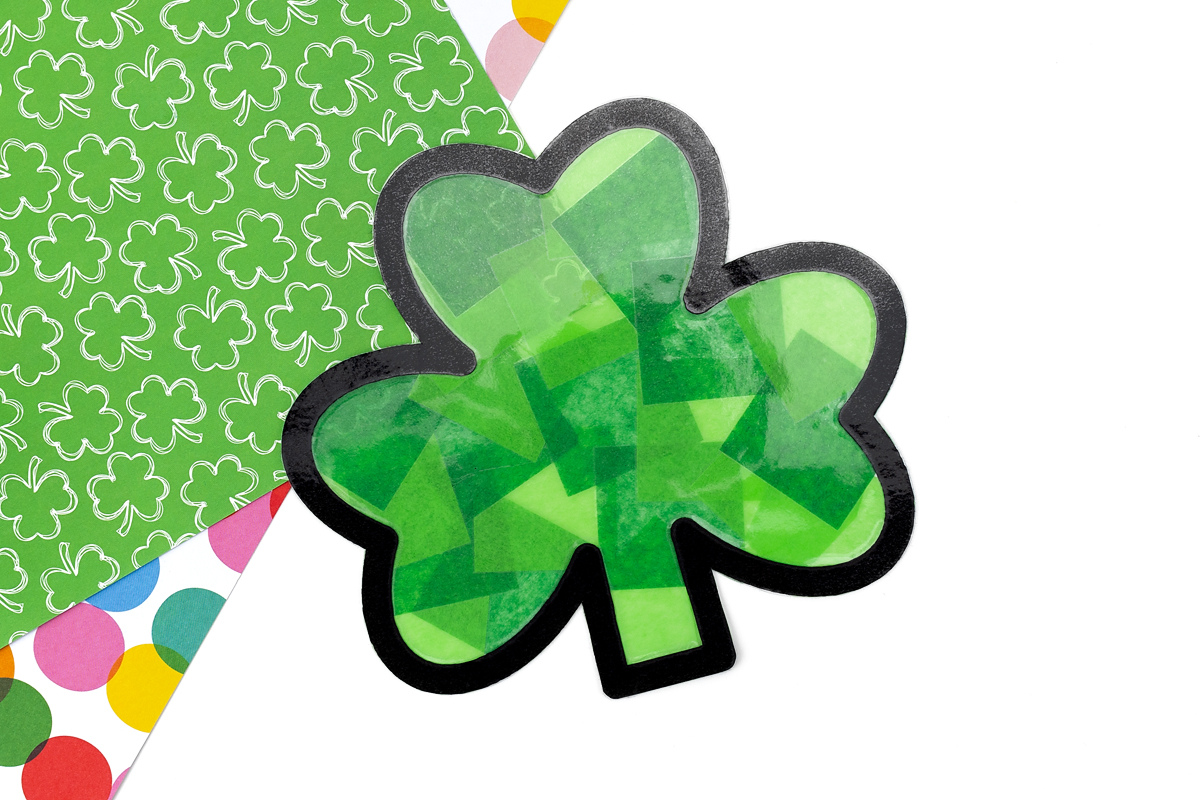
STEP 6: Hang your window decorations. These contact paper suncatchers bring a pop of vibrant color to any window—especially contrasting the brown of early spring—brightening up the entire room! Hang them with double-sided tape or sticky tack.

Crafting Tips
These tips will help your shamrock suncatchers turn out beautifully and make the process easier and more enjoyable.
- For easier cutting: The curved shamrock shape can be tricky! Use small, controlled snips and turn the paper—not the scissors—as you cut. Sharp scissors make all the difference.
- Tissue paper placement: Start with the stem first, then move to the three shamrock leaves. This helps everything fit nicely without gaps.
- Contact paper challenges: If contact paper sticks to itself, don’t worry! Gently pull it apart and smooth it back down. Work slowly, peeling back only a small section at a time.
- Window display: These suncatchers look most vibrant on windows that get direct sunlight for part of the day.
- Prevent tearing: Tissue paper can tear easily on contact paper. Press down gently but firmly, smoothing from the center outward to avoid wrinkles and tears.
- Making multiple suncatchers: When crafting with a classroom or group, pre-cut the shamrock frames ahead of time to save time and frustration.
Take it Further
Not only is this craft easy and inexpensive, but it also helps kids develop fine motor skills. Cutting, arranging tissue paper, and working with the shamrock template are excellent activities for little hands. Plus, the finished product makes a lovely decoration for your home, classroom, library, or care center.
Want to take it a step further? Try these fun extension ideas:
- Use this activity to introduce a lesson about shamrocks and their connection to St. Patrick’s Day.
- Pair this craft with a fun book about St. Patrick’s Day.
- Use cellophane, acetate sheets, construction paper, or crepe paper instead of tissue paper.
- Use this shamrock suncatcher craft to learn about the color green.
- Decorate classroom windows with a collection of suncatchers made by students.
- Try making a Rainbow Shamrock Suncatcher!
- Use our shamrock template as a set of St. Paddy’s Day coloring pages.
- Use this craft as a make-and-take at your community program.
Common Questions
Making shamrock suncatchers for the first time? These frequently asked questions will help ensure your project turns out beautifully.
This craft takes about 45 minutes to an hour, depending on your child’s age and cutting skills. Younger children may need adult help with the cutting portions.
This craft works well for ages 4 and up. Preschoolers (ages 3-5) will need help cutting the curved shamrock shapes, while older elementary students can complete it independently. The tissue paper portion is easy for all ages.
The large shamrocks measure about 6½ inches tall, while the smaller ones are around 3½ inches. They look wonderful displayed together on a window!
More St. Patrick’s Day Craft Ideas for Kids
Looking for more St. Patrick’s Day crafts? You may also enjoy:
- St. Patrick’s Day Paper Wreath Craft
- St. Paddy’s Day Hedgehog Craft
- Leprechaun-Inspired Macrame Gnomes
- Paper Cup Leprechaun Craft
- Popsicle Stick Leprechaun Craft
- Leprechaun Card Craft
- Torn Paper Shamrock
Save This Craft
Save this craft on Pinterest using the image below!


Shamrock Suncatcher
Ingredients
- Shamrock Suncatcher Template
- Tissue paper squares
- Black cardstock
- White cardstock
- Scissors
- Contact paper or self-seal laminating sheets
- Double-sided tape
Instructions
- Download and print the shamrock template. Click the link in the materials list to access the free printable by subscribing to our craft newsletter.
- Cut out the shamrock frame. Carefully follow the outlines of the shamrock suncatcher template with scissors. Because the shapes are curved, younger children may need a little help.
- Place down the shamrock outline. Lay the shamrock template onto the sticky side of the contact paper or self-seal laminating sheet. If using white cardstock shapes, be sure the printed side faces down.
- Add the tissue paper. Fill the suncatcher frame with tissue paper shapes, trimming pieces as needed to fit smaller details like the shamrock stem.
- Seal the design. Once the tissue paper is in place, cover it with a second adhesive sheet to secure everything. Then carefully trim around the edges of the suncatcher frame with scissors.
- Hang your window decorations. These contact paper suncatchers add a bright splash of color to any window. Use double-sided tape or sticky tack to display them.


Want even more?
Make sure to follow on Facebook, Pinterest, and Instagram for more easy crafts, activities, recipes, and parenting tips. And don’t forget to subscribe to our emails.